The Wall card also bends a wall, stacks its layers, lets it start above or below the floor, and pushes out a bay window.
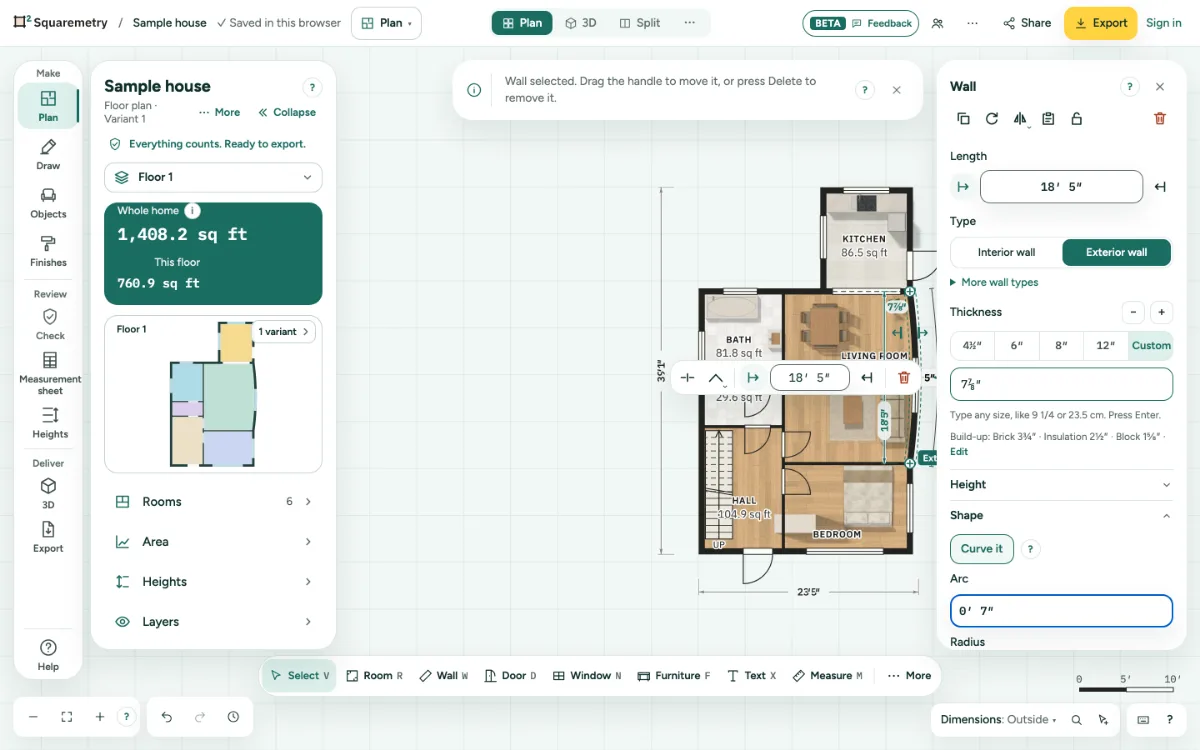
Curved walls, build-up, wall height and bay windows: step by step
1. Curve a wall
Under Curve, click Curve it, or drag the round handle next to the middle of the wall. Type a Height or Radius. Other side flips it and Straighten makes it straight again. Walls that join it partway stay attached and follow the curve. A curve stops just before it would touch another wall, and one line says how far it got. Doors and windows in the wall stay where they are if they still fit; otherwise they move up just enough, clear of each other and of the corners, and one line says how many. If they no longer fit, the wall stays as it was. A door or window in a wall that joins it stays put too.
2. Build-up
Click Build-up and pick Start from, or Add layer. The layers add up to the wall thickness. Drag a layer, or use the arrow keys on its grip, to change the order. At most 12 layers. With a build-up the thickness buttons still work: the difference goes into one layer (insulation, then cavity, then rigid insulation; never the load-bearing layer or the finish), and a notice says what changed, with Undo. If that layer would get thinner than 1 cm or thicker than 30 cm, nothing changes and the card says why, with Edit build-up.
3. Wall height
Under Wall height, set where the wall Starts at and its Top. A wall that starts above the floor lets the floor run on underneath; its top can follow the roof. A wall lower than a door or window in it is refused, with the limit in one line.
4. Bay window
On a straight exterior wall, open Bay window, choose Square or Angled, the Width and Depth, and click Add bay window. The bay joins the room behind it; Own room adds a room boundary. Place it clear of a connecting wall or room divider, or make it narrower, so existing rooms stay closed. Or place it yourself: in the small bar next to the wall, click Corner or bay, More, then Square bay or Angled bay, and place it along the wall like a split.
5. Wall sides
Under Wall sides, each side is named after the room it faces, such as Kitchen side, or Outside. Click + Kitchen side, or Change next to a side that has a finish: the library opens on the left with wall finishes only, under a heading such as Wall for the Kitchen side. Pick a colour or a finish; a colour alone is fine. It goes on at once, shows as a line on that side of the plan at every zoom, and in 3D. Below each side, Tiles in bands adds wall tiles, shown on the plan and in 3D.
Parts on the screen
Bend handle. The round handle next to the middle of a wall. Drag it to curve the wall, back to make it straight.
Messages you may see
- This wall is too short to curve.
- A wall has at most 12 layers.
- A bay window goes on an outside wall.
- A bay window needs a straight wall.
- 2 doors or windows moved so they still fit in the wall. Undo puts them back.
- The doors and windows would no longer fit in this wall. Nothing changed. Move or narrow one first.