One home, four places: the workspace Plan, where you draw, furnish, remodel and check, and three screens of their own: Model (free 3D shapes), Sheets (paper) and Present (only showing). All of them work on the same plan, with the same history and the same numbers. Survey and Remodel are part of Plan now: Review in the rail, Interior under Objects, Systems and remodel mode under Plan › More.
Workspaces and work profiles: step by step
1. Switch workspace
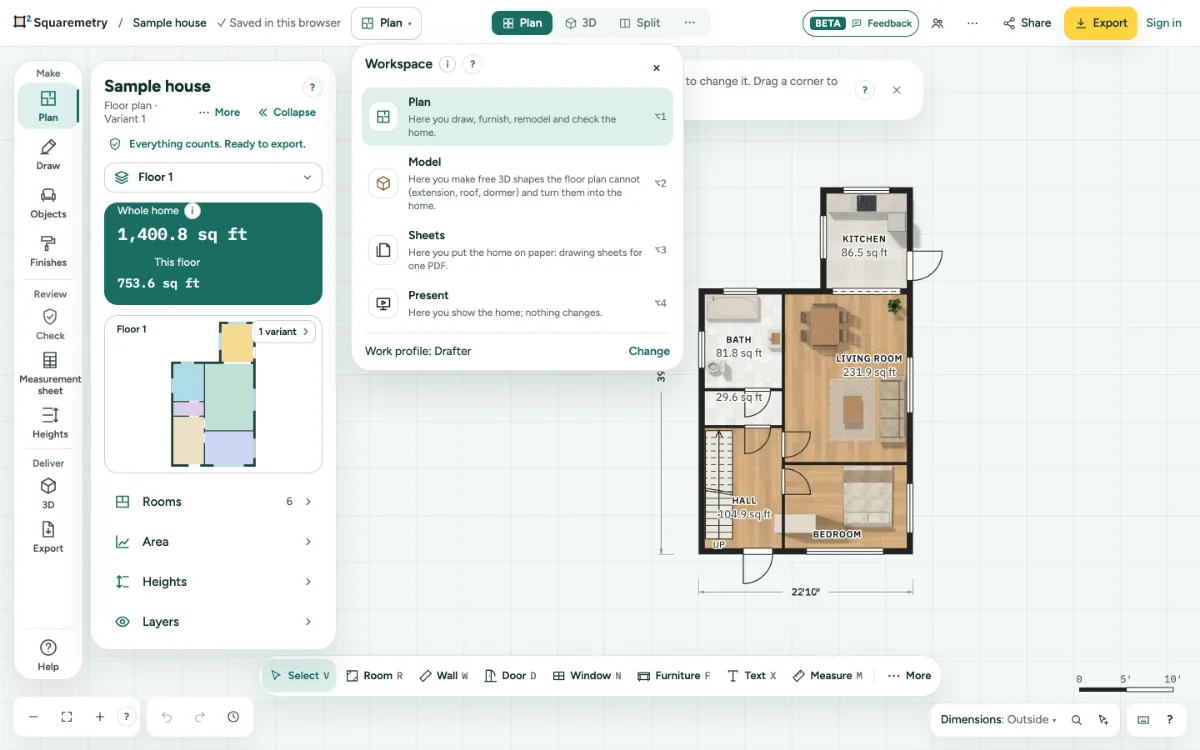
Click the Workspace menu at the top left, next to the name of your home, and pick where you want to be. The menu always shows the four in the same order, each with what it is for and its key. The (i) says why there is more than one: Plan is the workspace for everything you do on the drawing; Model and Sheets have their own tools; Present only shows. On a phone the menu is under the name of your home. A wall you are drawing stops when you switch, as with Esc, and Select is on again.
2. With keys
Each place has its own key, Alt with its number in the menu: ⌥1 Plan, ⌥2 Model, ⌥3 Sheets and ⌥4 Present. You can also search a place by name with ⌘K. When you arrive somewhere, one line at the bottom says where you are and how to go back.
3. Review, Interior, Systems and remodel mode
What used to be the Survey and Remodel editors is part of Plan. Review in the rail holds Check, Measurement sheet and Heights; the card on the right shows the check or the sheet. Interior (kitchen run, prices, documents) opens with Interior at the top of the library (Objects). Systems (electrical, water, heating and air) and remodel mode (Existing and After, with Existing, New and Demolish in the card of a wall, room, door or window) are under More in the Plan panel; once on, Systems stays in the rail. The plot, the ground and north are in Plan: click More in the toolbar and look under Outside.
4. Present
Present shows the plan full screen to a client; nothing changes there. It is the last line of the Workspace menu, it is under Share, and ⌥4 opens it from every place. Back to Plan or Esc takes you back to Plan.
5. Your work profile
Choose Homeowner, Real estate agent, Drafter, Energy assessor, Remodeler or Designer: on the start screen, with Change in the Workspace menu, or in Settings under My defaults. Your profile sets your ways to start; the menu stays the same for everyone. Every place comes with the same price.
6. The same bar in every place
Every place has the bar of Plan at the bottom. On the left: zoom, Undo (⌘Z), Redo and the history. In the middle: the tools, each with its icon and its name; on a screen of 1440 px or wider its key stands small and grey next to it, and the tip always names the key; the tool you chose is light green; More holds the rest. In Plan the bar is the same in Review, Interior and Systems. Choosing a tool lets go of what you had chosen, so its card closes; Select and Box select keep it. On the right: the choice that belongs to this place (Dimensions in Plan, Layers in Systems, View in Model, Sheet in Sheets), search (⌘K), the keyboard shortcuts and the question mark. A key you type in a text field stays in that field.
7. Customize the bar
Under More or under the question mark, choose Customize bar. Put the tool bar at the bottom, top, left or right (on the left or right it becomes a narrow rail with the name under each icon), and the other blocks and the side panel left or right; hide what you do not need; choose which tools stay in the bar and in what order; show the name at every tool (the default), only at the chosen tool, or Compact: icons and keys. Wherever you put it, the bar and the panels never lie over each other: at the top the rail, the panels and the library start below the bar, at the bottom the rail, the panels and the library end above it, and on the left or right they move aside. Right-click a tool to get there quickly. Back to default puts everything back in one click. Your choice stays in this browser and, when you are signed in, in your account: on another computer the bar is where you left it. On a phone the bar keeps its own place at the bottom.
8. The rail next to the panel
Next to the panel on the left is a narrow rail over the full height, in three groups. Make holds four sections, each an icon with its word: Plan (floors, rooms, the area, heights and layers), Draw (wall, room, door, window and stair; their card with the thickness, height or type opens on the right; More drawing tools holds the rest; below them the AI: Plan from a description, Plan from a sketch or photo and Change the plan with a sentence), Objects (opens the library on the right, like the Furniture tool; Interior is at the top of it) and Finishes (the floor of the whole floor and the walls of a room or the whole floor, each in one step, and the facade and the roof of the whole home; the floor and ceiling of one room are in its card); Systems joins them once you turned it on. The chosen section has a green field, bold letters and a line on its edge; only one section is chosen at a time. Click it again to fold the panel away and keep only the rail. Click a room on the drawing and its panel opens under Plan. Review holds Check, with a red number when there are points to check (it opens the one list at the top of Plan and the check on the right), Measurement sheet (the sheet of the standard on the right) and Heights (floor heights and levels; under More the build-up per floor). Measuring a distance is a tool: M in the bar. Deliver holds 3D and Export. Help, at the bottom of the rail, opens Where is what. On a lower screen the rail scrolls: a fade with a small arrow at the bottom says there is more, and a click or tap on it scrolls to the end. In Model, Plan opens its Overview, Objects its Parts and Finishes its Colours and materials; Draw is grey, because in Model you draw with the bar. With the keyboard: Tab reaches the rail, the arrow keys move through the four sections and Enter chooses; Tab goes on to Check, Measurement sheet, Heights, 3D, Export and Help. On a phone the sections, Check, Measurement sheet and Heights are a row of words at the top of the Rooms sheet. Hide the rail in Customize bar; it goes left or right with the panel.
9. Where is what
Click Help at the bottom of the rail, or choose Where is what under the question mark at the bottom right. Pick a task and you are there; search (⌘K) finds the same tasks and shows where each one is. See the floor area: Plan › Area. What counts and what not: Plan › Area › What counts. Go to another floor: Plan › floor field. Pick a room: Plan › overview, or on the drawing. Change the room type: Pick the room › card › Kind. Change the floor of a room: Pick the room › card › Floor. Choose the flooring: Finishes › Floor. Change the facade material: Finishes › Facade. Change the roof covering: Finishes › Roof. Give an extension its own roof: Floors › Roof › Roof parts. Make a variant: Plan › Variants. Hide or lock a layer: Plan › Layers. Change the ceiling height: Plan › Heights. Draw a room: Bar at the bottom › Room, or Draw. Draw a wall: Bar at the bottom › Wall, or Draw. Place a door and pick its type: Bar at the bottom › Door, then the type. Change the length of a wall: Click the wall, then type the length. Add furniture: Objects. Add a floor (attic): Plan › floor field › Add floor. Trace a drawing or photo: More in the bar › Trace. Make the measurement report: Export › Measurement report (PDF), or Plan › Area. Plan as PDF or image: Export, top right › PDF or PNG. Share with a client: Share, top right › Make a link. Show inside or outside dimensions: Dimensions, bottom right. See everything again: Shift 1, or double-click the zoom block. Undo a step: Undo, bottom left. See the home in 3D: 3D, at the top. Model in 3D (a shed, or a whole house): Workspace menu, top left › Model; tools in the bar at the bottom, sizes in the Measurement box at the top left. Help with what I am doing: The ? next to a title, or bottom right.
10. One home everywhere
A wall you move in Plan moves in 3D, on the sheets, in the measurement report and in the systems. What you chose stays chosen when you switch, and Undo works across all places. When you undo something you did in another place, a message says which place and what.
Parts on the screen
Workspace menu. Shows where you are. Click it to switch between Plan, Model, Sheets and Present, or to change your work profile.

Rail next to the panel. Make: Plan, Draw, Objects and Finishes. Review: Check, Measurement sheet and Heights. Deliver: 3D and Export. Help at the bottom.
Shortcuts
- ⌥1
- Workspace Plan
- ⌥2
- Workspace Model
- ⌥3
- Workspace Sheets
- ⌥4
- Present, from every place
- ⌘K
- Search tools, actions and help
On Windows and Linux, use Ctrl where the Mac has ⌘.
Messages you may see
- Survey is now part of Plan: Review in the rail (Check, Measurement sheet, Heights).
- Remodel is now part of Plan: remodel mode is on. Interior is under Objects, Systems under Plan › More.
- Interior is now part of Plan, under Objects.
- Systems is now part of Plan, in the rail under Make.
- Site is now Outside in Plan, under More in the toolbar.
- Model works on a tablet or computer. You are in Plan.
- This workspace does not exist. You are in Plan.