In Systems, give each socket and switch its mounting height, see the size to the walls, connect switches to lights, draw or lay cables with their length, and build the fuse box with an overview.
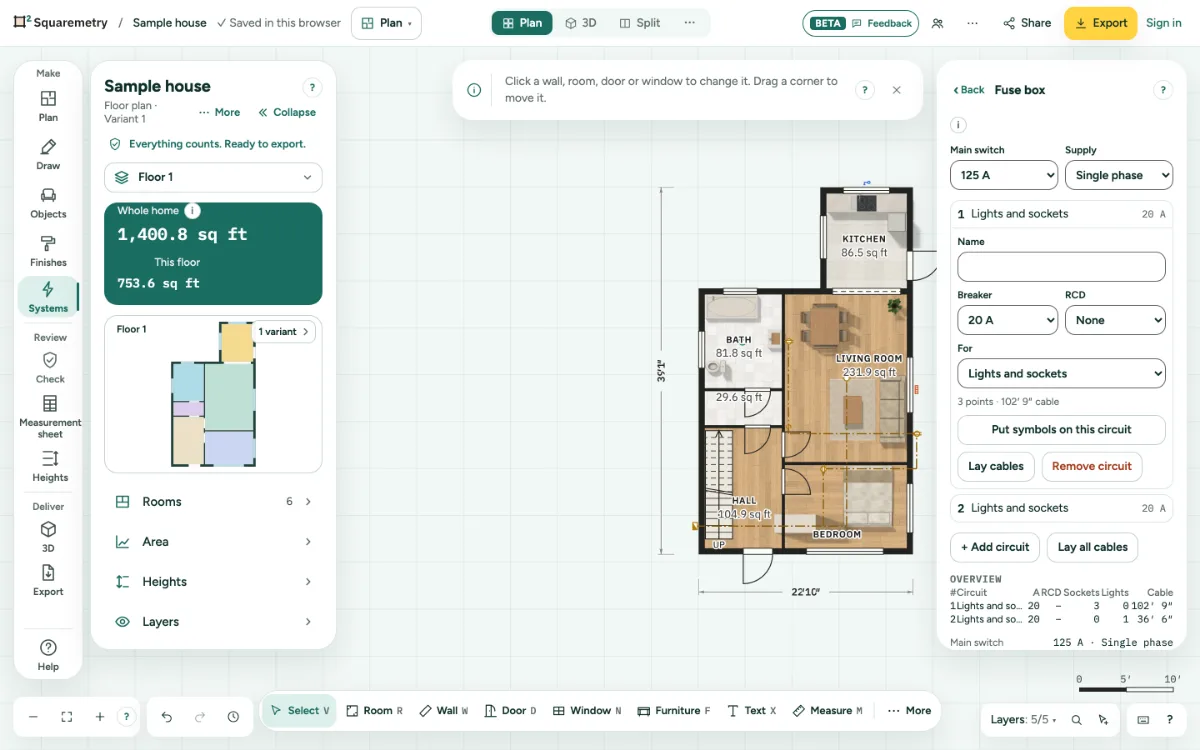
Electrical plan: heights, switches, cables and the fuse box: step by step
1. Mounting height
Click a socket or switch. Its card shows the usual height (Dutch: socket 0.3 m, switch 1.05 m; US: 16″ and 48″). Type your own, like 1.2 or 120 cm. Use the usual height puts it back. A ceiling light or vent is on the ceiling; a floor drain has no height. Click Put it on a wall at a height to give it one anyway: then it also shows in the wall elevation, and Back to the ceiling or Remove the height undoes it. A soil stack runs from the floor to the ceiling.
2. Size to the walls
The card shows the size to the nearest walls. Under Layers, Heights and distances to walls puts the height and these sizes on the plan, also in the export. Two sockets on the same spot, one above the other, get one label with both heights: give the first its own height, then place the second.
3. Switch to light
Click a switch and tick the lights it switches, or click Connect lights on the plan and click each light; click it again to take it off. A dashed curve joins switch and light. Two switches on one light make a two-way circuit.
4. Kinds of light
Under Electrical, pick a ceiling light or wall light, or under More symbols a recessed spot, surface spot, track light, linear light or LED strip. A switch can switch every kind.
5. Lighting plan
Lights switched by exactly the same switches form a switch group with a letter: a, b, c. The card of a switch or light shows its group: one switch, two-way switching with 2 switches, or two-way with intermediate switching from 3 switches. The card of a switch also gives tips: a one-way switch in a two-way group (Make it a two-way switch changes it in one undo step), a two-way switch with no second one, or a switch that switches more groups than it has levers. The drawing set and Sheets get a Lighting plan per level: only lights and switches, the switch lines, the letters, and a legend with the groups, the count per kind of light and: Drawing aid, not an installation design. In Sheets, Switch groups is also a table.
6. Draw a cable
Open Electrical, then Pipes, pick Cable, choose the cable size and click point by point. Click the last point again, double-click or press Enter to finish. The length counts the run along the plan plus the parts up and down to each symbol at the ends.
7. Fuse box
Open Electrical, then Fuse box. Set the main switch and the supply, then Add circuit. Open a circuit to name it and set the breaker, the RCD and what it is for. Click Put symbols on this circuit and click sockets and lights on the plan, or pick the circuit in the card of a symbol.
8. Lay cables
Place a meter cupboard, then click Lay cables on a circuit, or Lay all cables. Each point gets a run from the meter cupboard or the point before it, with the height between levels added. ⌘Z takes them away again.
9. Overview and count
The overview lists each circuit with its breaker, RCD, sockets, lights and cable length. The count adds up the main switch, RCDs, breakers and modules (US: spaces). To check lists what is usual to look at again, like more than 4 circuits on one RCD, or a circuit on three phases with a single phase supply. The CSV export has the main switch and the supply above the overview. A fuse box has at most 60 circuits and 12 RCDs.
10. Panel schedule and single-line diagram
Under Fuse box, click Panel schedule as PDF. Export opens with only the systems sheets of the drawing set: the panel schedule (per circuit the number, name, kind, breaker, RCD, poles, points, rooms and cable length; 25 circuits per sheet) and a single-line diagram (the main switch, each RCD with its circuits, and the circuits without an RCD). Every sheet says: Drawing aid, not an installation design. The whole drawing set brings back all sheets. Like every export other than the small free PNG, these sheets need an unlocked home, Pro or Team.
Shortcuts
- Esc
- Stop, then Select, then let go
- ⌘Z
- Undo
On Windows and Linux, use Ctrl where the Mac has ⌘.
Messages you may see
- Light connected to the switch.
- Place a meter cupboard first; cables start there.
- Higher than the ceiling of this level (2.6 m).